

I still remember the first time I created this recipe. It was a rainy Saturday afternoon, and my son was craving both pizza and grilled cheese. Rather than choosing between them, I thought, “Why not combine them?” Standing in my kitchen with basic ingredients from the fridge, I experimented until this perfect hybrid was born. The look on his face when he took that first bite – cheese stretching between sandwich halves – told me we had a winner.
The Magic of Two Comfort Foods in One
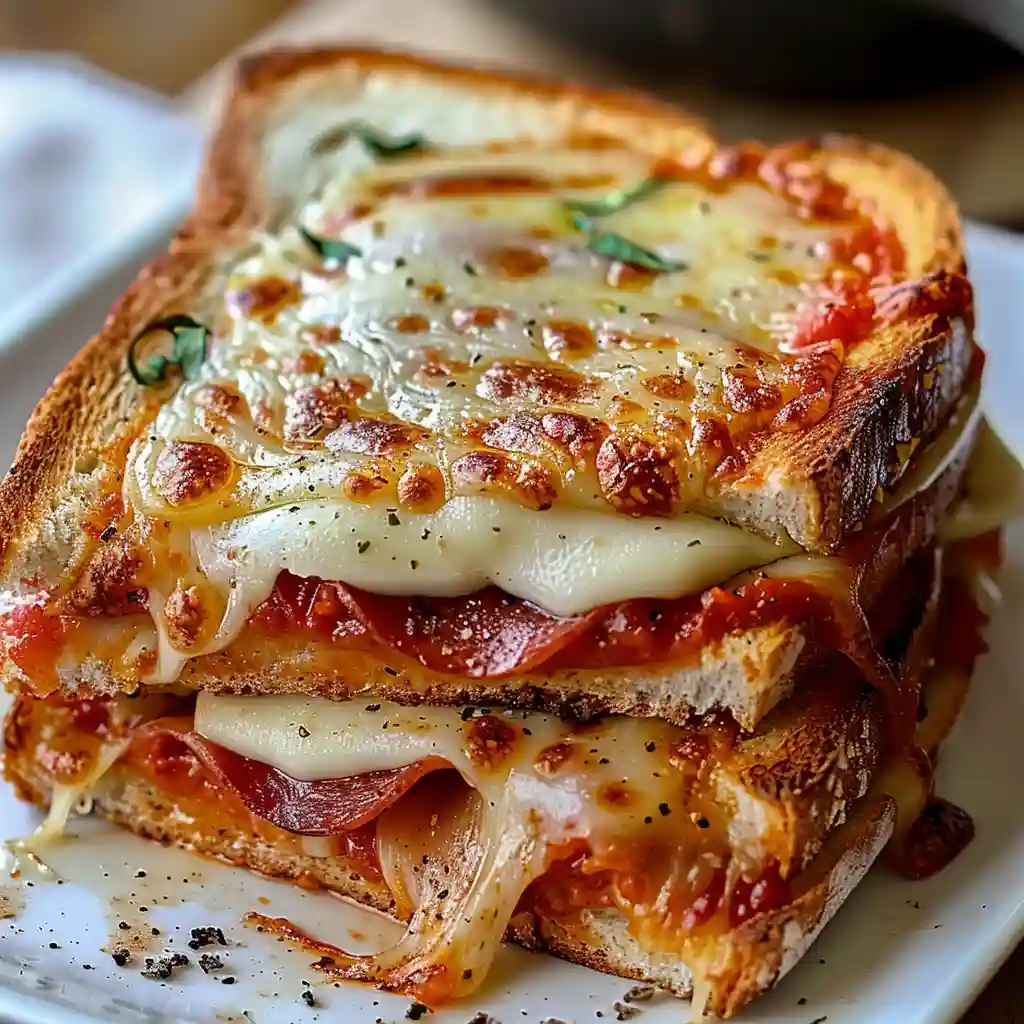
What makes this sandwich special is how it captures everything we love about pizza – the tangy sauce, melty cheese, and savory toppings – but delivers it in a crispy, buttery grilled cheese format. I’ve made this countless times since that rainy afternoon, tweaking the spice blend and testing different breads until I found the perfect balance.
The garlic powder and Italian seasoning infused into the butter creates a flavor-packed exterior that reminds me of the best garlic bread, while the interior stays gooey and delicious. It’s become my go-to solution for busy weeknights when I want something more exciting than a basic sandwich but don’t have time for homemade pizza dough.
What You’ll Need
Bread: 4 slices; I prefer sourdough for its slight tang and sturdy structure, but any good-quality white bread works beautifully. When I’m feeling virtuous, whole wheat bread adds a nutty dimension.
Butter: Softened; the canvas for our garlic and herbs. I’ve found that salted butter adds just the right flavor boost.
Marinara or pizza sauce: The heart of any good pizza experience. I keep jars of my homemade sauce in the freezer, but any good-quality store-bought sauce works wonderfully.
Mozzarella cheese: Shredded; provides that quintessential pizza stretch. I prefer low-moisture mozzarella as it melts beautifully without making the sandwich soggy.
Parmesan cheese: Grated; adds that sharp, salty bite that elevates this sandwich. I’ve tried this recipe without it, and trust me, the Parmesan makes all the difference.
Turkey pepperoni: My family’s preferred topping, but I’ve made this with everything from thinly sliced mushrooms to bell peppers with equally delicious results.
Garlic powder and Italian seasoning: These transform a simple buttered exterior into something magical. I’ve experimented with different herb combinations, but always come back to this classic duo.
Fresh basil: Optional, but adds a bright finish that cuts through the richness. In summer, when my windowsill herb garden is thriving, I never skip this.
Let’s Get Cooking
Prepare Your Canvas
Start by softening the butter just enough to spread easily—I usually leave it out while gathering my other ingredients. Spread a thin, even layer on one side of each bread slice. Then comes my favorite part: sprinkle the garlic powder and Italian seasoning directly onto the butter. This simple step infuses the exterior with flavor as it toasts, creating an aromatic crust that reminds me of the best garlic bread.
Build With Intention
With the seasoned sides facing down (this is crucial!), I spread a thin layer of marinara on the inside of each slice. Too much sauce makes for a soggy sandwich—a lesson I learned the hard way during my early testing. Layer your cheeses and toppings generously but not excessively. I like to start with a bit of mozzarella, add the pepperoni, sprinkle the Parmesan, and finish with more mozzarella. This cheese-topping-cheese approach ensures everything stays put when melted.
The Slow Toast Secret
Here’s where patience becomes your friend. I heat my cast-iron skillet over medium-low heat—never higher. After several test batches with burned exteriors and cold centers, I discovered that the low-and-slow approach gives the cheese time to melt completely while the bread achieves that perfect golden crispness. I press down gently with a spatula occasionally, which helps the sandwich seal together and ensures even browning.
The Finishing Touch
After removing the sandwich from the skillet, I let it rest for just a minute—this allows the molten interior to set slightly, making it easier to slice without losing all that beautiful melted cheese. A sprinkle of fresh basil brightens everything up. When photographing these for the blog last month, the contrast of the vibrant green basil against the golden sandwich by my dining room window created such a beautiful image that I now add basil even in winter, when I have to buy it from the store.
Make It Your Own
When my vegetarian friend Emily came for lunch last week, I replaced the pepperoni with sautéed mushrooms and spinach. The earthiness of the mushrooms paired beautifully with the tangy sauce.
For my husband’s birthday dinner, I created a “supreme” version with thinly sliced bell peppers, olives, and red onions that had been quickly sautéed to soften them. The extra prep was worth every minute.
During a particularly indulgent weekend experiment, I tried a “breakfast pizza” variation with scrambled eggs and bacon inside. My teenage son has requested it every weekend since.
What I’ve Learned
The bread matters more than you might think. After trying everything from basic white to artisanal loaves, I’ve found that a slightly sturdy bread with a tight crumb structure works best to contain all the fillings.
Pre-shredded mozzarella works perfectly here. While I usually prefer to shred cheese myself for better melting, the slight anti-caking agents in pre-shredded cheese actually help prevent the sandwich from becoming too wet.
Slicing pepperoni extra thin prevents the sandwich from becoming bulky and difficult to flip. When I’m using a thicker cut pepperoni, I chop it into smaller pieces.
A quick rest after cooking isn’t just for photography—it actually improves the eating experience by allowing the molten filling to set just enough to not burn your mouth.
Frequently Asked Questions
Can I make this ahead of time for lunches? → I don’t recommend fully assembling and cooking in advance, but you can prep all ingredients and store separately. For school lunches, I cook them in the morning, wrap in foil, and they’re still delicious at room temperature.
My sandwich gets too soggy. What am I doing wrong? → You’re likely using too much sauce. Start with just a tablespoon per bread slice and make sure your bread is toasting properly before flipping.
What’s the best pan to use? → After testing this recipe with various cookware, I prefer a heavy cast-iron skillet, but any non-stick pan works well. The key is even, moderate heat.
Can I use different cheeses? → Absolutely! I’ve made this with provolone and even cheddar with delicious results. The key is to always include some mozzarella for that authentic pizza stretch.
My cheese isn’t melting completely before the bread browns too much. Help! → Lower your heat and be patient. You can also cover the pan with a lid for a minute to trap heat and help the cheese melt faster without overtoasting the bread.
Print
Pizza Grilled Cheese
- Total Time: 18 minutes
- Yield: 2 sandwiches 1x
Description
A delicious fusion sandwich that combines the flavors of a classic pepperoni pizza with the comfort of a grilled cheese. Crispy buttery bread filled with gooey melted cheese and savory pizza toppings makes this the perfect quick meal for pizza lovers.
Ingredients
- 4 slices of bread (sourdough, white, or whole wheat)
- 2 tbsp butter, softened
- ½ cup marinara or pizza sauce
- 1 cup shredded mozzarella cheese
- ¼ cup grated Parmesan cheese
- 12 slices of turkey pepperoni
- ½ tsp garlic powder
- ½ tsp Italian seasoning
- 2 tbsp chopped fresh basil (optional)
Instructions
- Prepare the Bread: Spread a thin layer of butter on one side of each slice of bread. Sprinkle the buttered side with garlic powder and Italian seasoning to infuse extra pizza flavor as it toasts.
- Assemble the Sandwich: Place two slices of bread, buttered side down, on a flat surface. Spread marinara sauce on the inside of each slice. Layer shredded mozzarella, Parmesan, turkey pepperoni, and any extra toppings of your choice. Top with the remaining bread slices, buttered side up.
- Toast the Sandwich: Heat a skillet or griddle over medium-low heat. Place the sandwiches in the pan and cook for 3-4 minutes per side, pressing down slightly with a spatula. Flip carefully and continue cooking until the bread is golden brown and the cheese is fully melted.
- Serve and Enjoy: Remove the sandwiches from the skillet and let them cool for a minute. Slice them in half and garnish with fresh basil for an extra pop of flavor. Serve with a side of marinara sauce for dipping.
Notes
- For a crispier crust, you can add a thin layer of mayonnaise to the outside of the bread instead of butter.
- Try using different pizza toppings like sautéed mushrooms, bell peppers, or Italian sausage.
- For a vegetarian option, skip the pepperoni and add more vegetables.
- Use a panini press if available for even cooking and those signature grill marks.
- Low-moisture mozzarella works best as it melts better and doesn’t make the sandwich soggy.
- Prep Time: 10 minutes
- Cook Time: 8 minutes
- Category: Main-course
- Method: Stovetop
- Cuisine: Italian-American
Nutrition
- Serving Size: 1 sandwich
- Calories: 420
- Sugar: 3g
- Sodium: 840mg
- Fat: 23g
- Saturated Fat: 12g
- Unsaturated Fat: 9g
- Trans Fat: 0g
- Carbohydrates: 32g
- Fiber: 2g
- Protein: 20g
- Cholesterol: 65mg