

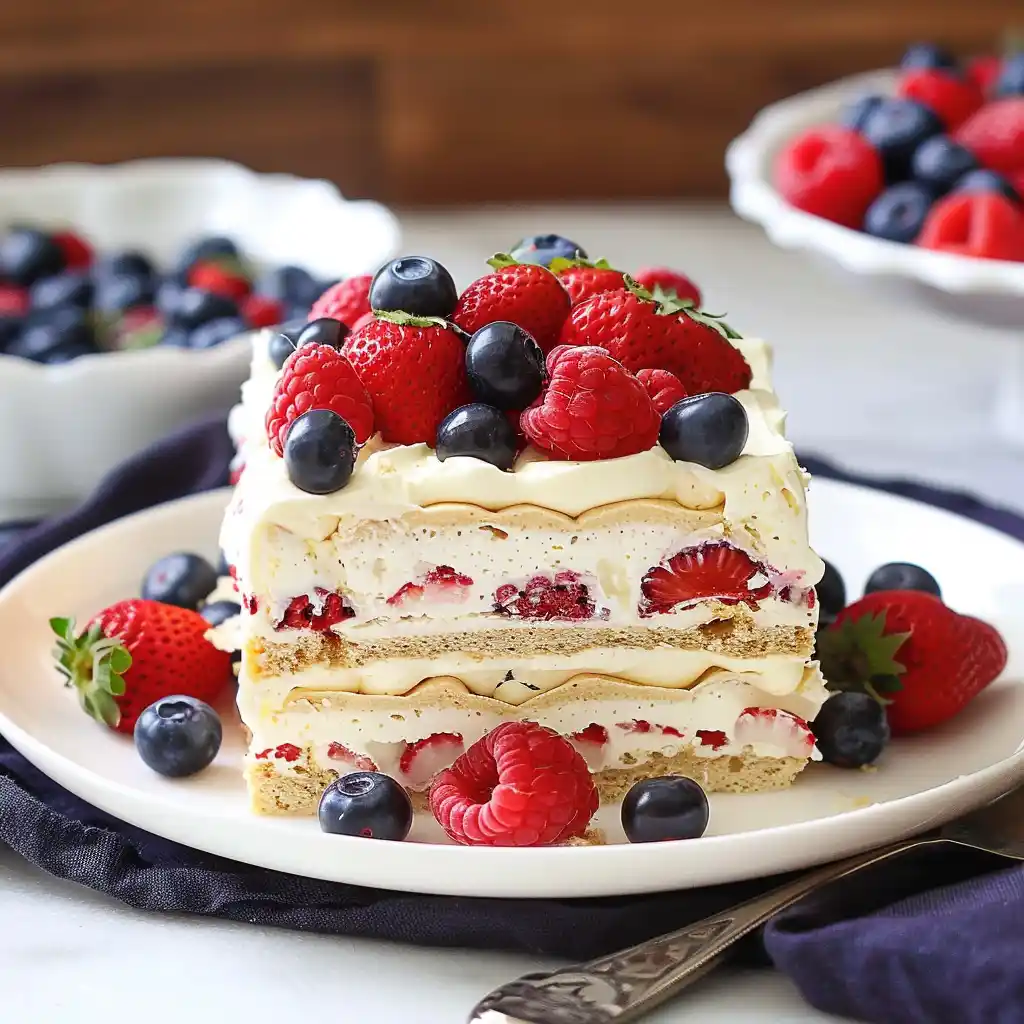
This No Bake Summer Berry Icebox Cake is a refreshing dessert perfect for warm weather gatherings. Layers of graham crackers soften between luscious cream cheese pudding and fresh summer berries, creating a cake-like texture without ever turning on the oven. This crowd-pleasing treat combines the classic flavors of vanilla, berries, and cream in a stunning make-ahead dessert.
Why You’ll Love This Recipe
- No baking required, making it perfect for hot summer days when you don’t want to heat up the kitchen
- Make-ahead friendly – actually tastes better when prepared a day in advance
- Beautiful red, white, and blue presentation makes it ideal for summer holidays
- Uses simple ingredients that are readily available at any grocery store
- Easily customizable with different berries or flavors depending on the season
Ingredients
- Graham Crackers: The foundation of this dessert that magically transforms into cake-like layers as they soften. Honey grahams work best for their subtle sweetness.
- Cream Cheese: Use full-fat cream cheese for the richest flavor and texture. Make sure it’s properly softened to avoid lumps in your filling.
- Vanilla Instant Pudding: This provides structure and flavor to the creamy layers. French vanilla pudding can also be used for a slightly different flavor profile.
- Milk: Cold milk is essential for properly setting the pudding. Whole milk creates the richest texture, but 2% works well too.
- Cool Whip: Provides a light, fluffy texture to the filling. You can substitute with homemade whipped cream for a less sweet, more natural option.
- Fresh Strawberries: Look for bright red berries with no soft spots. Hull and slice them evenly for the best presentation and texture.
- Fresh Blueberries: Choose firm, plump berries with a dusty blue color. Rinse and dry thoroughly before using.
- White Chocolate Chips: Used for the elegant drizzle on top. Choose high-quality white chocolate for the best melting properties and flavor.
Variations
Chocolate Lover’s Version
Replace the vanilla pudding with chocolate pudding and use chocolate graham crackers instead of regular ones. Add a layer of sliced bananas along with the berries for a chocolate-covered banana split twist.
Tropical Paradise
Swap the berries for diced mango, kiwi, and pineapple. Add a teaspoon of coconut extract to the pudding mixture and sprinkle toasted coconut between the layers and on top instead of white chocolate.
Lemon Berry Delight
Add 2 tablespoons of lemon zest to the pudding mixture and replace one package of vanilla pudding with lemon pudding. The bright citrus flavor pairs beautifully with the berries for an even more refreshing summer dessert.
How to Make the Recipe
Step 1: Prepare the Cream Filling
Beat the softened cream cheese in a large bowl until smooth and fluffy. Add the dry pudding mixes and continue beating until well combined. Gradually add the cold milk, mixing continuously to prevent lumps. Gently fold in most of the Cool Whip, reserving about ½ cup for garnishing if desired. The mixture should be smooth, fluffy, and well-combined.
Step 2: Start Layering
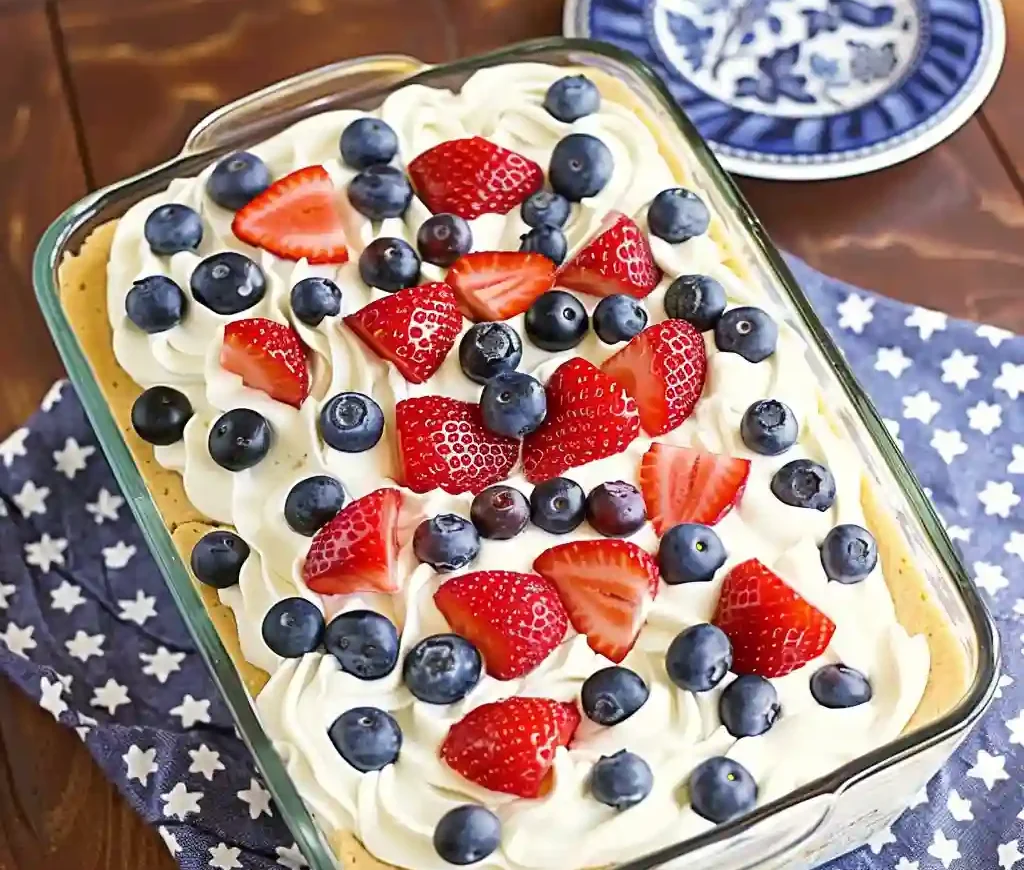
Spread a thin layer of the Cool Whip on the bottom of a 9×13 inch pan – this helps prevent the graham crackers from sticking. Arrange 5 graham crackers across the center of the pan, then add 2 more, breaking them as needed to create a complete layer covering the bottom of the pan. Spread about 1/3 of the pudding mixture evenly over the graham crackers, then top with a generous layer of blueberries and sliced strawberries.
Step 3: Continue Layers and Chill
Repeat the layering process two more times: graham crackers, pudding mixture, and berries. You should have three complete sets of layers, ending with berries on top. Cover the dish with plastic wrap and refrigerate for at least 4 hours, but preferably overnight. This resting time is crucial as it allows the graham crackers to soften and achieve that perfect cake-like texture.
Step 4: Add the Finishing Touch
When ready to serve, melt the white chocolate chips according to package directions. Drizzle the melted white chocolate over the top of the dessert using a spoon or transfer it to a small zip-top bag with a corner snipped off for more precision. This adds an elegant finishing touch and enhances the visual appeal of the dessert.
Tips for Making the Recipe
- Soften your cream cheese completely at room temperature to avoid lumps in the filling
- For clean slices, use a sharp knife dipped in hot water and wiped dry between cuts
- Pat your berries dry after washing to prevent excess moisture from making the dessert soggy
- When melting white chocolate, use short bursts in the microwave and stir frequently to prevent scorching
- Build the icebox cake in the serving dish as it cannot be transferred once assembled
- For the most vibrant presentation, save some of your best-looking berries for the final top layer
How to Serve
This No Bake Summer Berry Icebox Cake is best served cold directly from the refrigerator. Cut into squares and use a cake server or spatula to carefully lift each portion. Garnish with additional fresh berries or mint leaves for an extra special presentation. This dessert pairs beautifully with a cup of coffee or tea, or for a truly indulgent treat, serve with a small scoop of vanilla ice cream on the side. For summer gatherings, this makes an impressive centerpiece dessert, especially for Fourth of July or Memorial Day celebrations thanks to its red, white, and blue color scheme.
Make Ahead
This dessert is actually designed to be made ahead! For best results, prepare the icebox cake at least 4 hours before serving, but it’s truly at its peak when made the day before. The graham crackers need time to soften and achieve that cake-like texture that makes this dessert so special.
You can prepare all components separately up to a day in advance: wash and slice the berries, mix the pudding filling, and store them separately in the refrigerator. Assemble when you’re ready. The completed icebox cake will keep well in the refrigerator for up to 3 days, though the presentation is best within the first 48 hours before the berries begin to release too much juice.
FAQs
Can I use frozen berries instead of fresh?
While fresh berries provide the best texture and appearance, you can use frozen berries in a pinch. Thaw them completely and drain very well to remove excess moisture, which could make your cake soggy. Pat them dry with paper towels before using.
My graham crackers aren’t softening enough. What went wrong?
The graham crackers need adequate time and moisture to soften properly. Make sure you’re allowing at least 4 hours (preferably overnight) of chilling time. Also, check that your pudding mixture isn’t too thick – it should be spreadable but not stiff.
Can I make this dessert dairy-free?
Yes! Use dairy-free cream cheese, dairy-free pudding mix, plant-based milk, and dairy-free whipped topping. The structure and technique remain the same, though the flavor may vary slightly.
How far in advance can I make this dessert?
This icebox cake is best made 1 day ahead and consumed within 2-3 days. After that, the berries will begin to break down too much and the texture will start to deteriorate.
Conclusion
This No Bake Summer Berry Icebox Cake is the perfect solution for summer entertaining when you want an impressive dessert without heating up your kitchen. With its beautiful layers, fresh berry flavor, and make-ahead convenience, it’s sure to become a seasonal favorite in your recipe collection. The magic happens as the dish chills, transforming simple ingredients into a dessert that tastes like so much more than the sum of its parts. Whether for a holiday celebration, a potluck, or a family dinner, this refreshing treat delivers both stunning presentation and delicious flavor with minimal effort.
Print
No Bake Summer Berry Icebox Cake
- Total Time: 4 hours 30 minutes (including chilling time)
- Yield: 12 servings 1x
- Diet: Vegetarian
Description
A delightfully refreshing dessert that layers graham crackers with creamy vanilla pudding and fresh summer berries. This no-bake icebox cake is perfect for hot summer days when you don’t want to turn on the oven.
Ingredients
- 19 oz graham crackers
- 8 oz cream cheese, softened
- 2 (3.4 oz) packages Vanilla Instant Pudding
- 2–1/2 cups cold milk
- 12 oz Cool Whip (or homemade whipped cream)
- 3 cups fresh strawberries, sliced
- 1–1/2 cups fresh blueberries
- 2 oz white chocolate chips
Instructions
- Prepare the cream mixture – Beat cream cheese and dry pudding mixes in a large bowl with a mixer until well blended. This creates the base of your creamy filling. Make sure the cream cheese is properly softened to avoid lumps in your mixture.
- Add milk – Gradually beat in the cold milk into the cream cheese mixture until smooth and well incorporated. The pudding will start to thicken as you mix it with the milk.
- Incorporate Cool Whip – Gently fold in the Cool Whip or homemade whipped cream into the pudding mixture, reserving ½ cup for later use. Use a spatula and fold with a light hand to maintain the airy texture of the whipped cream.
- Begin layering – Spread a thin layer of Cool Whip in a 9×13 pan just to coat the bottom. This prevents the graham crackers from sticking to the pan and helps them soften.
- Add first graham layer – Layer 5 graham crackers across the center of the pan, then 2 more, breaking them as needed to fit around the top and bottom edges. Create a solid base layer of crackers that covers the entire bottom of the pan.
- Add first pudding and berry layer – Spread a layer of pudding mixture over the graham crackers and top with a layer of blueberries and sliced strawberries. Distribute the berries evenly for a beautiful presentation.
- Continue layering – Place graham crackers on top of the berries, followed by another layer of pudding mixture, then another layer of berries. Press down gently on each layer to eliminate air pockets.
- Complete the layers – Repeat the graham-pudding-berries layers one more time (3 times total) until you reach the top of the pan. The final layer should be the colorful berries on top.
- Refrigerate – Cover and refrigerate for at least 4 hours or overnight until the graham crackers have softened completely. This resting time is crucial as it allows the crackers to absorb moisture and transform into a cake-like texture.
- Final decoration – When ready to serve, melt white chocolate chips in a bowl as directed on package and drizzle over the dessert. You can use a spoon to drizzle it over the tops of the berries or put it into a small zip-top bag and snip off the corner for an easy “piping bag.”
Notes
- For best results, allow the cake to chill overnight so the graham crackers fully soften.
- You can substitute other berries like raspberries or blackberries based on what’s in season.
- For a lighter version, use low-fat cream cheese and sugar-free pudding mix.
- The cake will keep in the refrigerator for up to 3 days, though the berries are best when served within 24 hours.
- For a more festive look, arrange the berries in patterns on top for holidays (red and blue for July 4th).
- Prep Time: 30 minutes
- Cook Time: 0 minutes
- Category: Desserts
- Method: No-cook
- Cuisine: American
Nutrition
- Serving Size: 1 slice
- Calories: 385
- Sugar: 28g
- Sodium: 420mg
- Fat: 17g
- Saturated Fat: 10g
- Unsaturated Fat: 6g
- Trans Fat: 0g
- Carbohydrates: 52g
- Fiber: 2g
- Protein: 5g
- Cholesterol: 35mg