


The moment autumn arrives, my kitchen transforms into a spice-scented sanctuary. These chewy pumpkin cookies emerged from my three-year quest to create the perfect fall cookie – one with genuine pumpkin flavor but without the cakey texture that so often plagues pumpkin baked goods. I must have tested this recipe fifteen different ways, adjusting moisture levels and ingredients until my family begged me to stop (though they never complained about eating the test batches).
What started as a simple baking experiment has become an October tradition. Now, when the leaves begin to change, my daughter knows it’s time to pull out the mixing bowls and spices. There’s something magical about the way these cookies fill our home with warmth, creating those little pockets of connection that make the season so special.
The Science Behind the Chew
The secret to these cookies eluded me for the longest time. Pumpkin naturally adds moisture, which typically creates a soft, cakey texture rather than the chewy bite I was after. The breakthrough came during a rainy Sunday afternoon when, on my fourth batch of the day, I tried blotting the pumpkin puree with paper towels.
That simple step transformed everything. By removing excess moisture from the pumpkin, I maintained all the flavor while achieving that elusive chewy texture. The brown sugar works alongside this technique, adding both moisture and that subtle molasses note that pairs so beautifully with the spices.
I’ve found the balance of butter to flour crucial too. Too much butter and the cookies spread too thin; too little and they become dense. After countless test batches (and a very happy neighborhood when I shared the extras), this ratio proved perfect.
What You’ll Need
Pumpkin puree: About 1/2 cup before blotting, which reduces to roughly 1/4 cup; I consistently find Libby’s works best, but any 100% pure pumpkin (not pumpkin pie filling) will do. The moisture content varies slightly between brands, so blotting is essential regardless.
All-purpose flour: Measured carefully by spooning into measuring cups and leveling off; this precision matters tremendously for texture.
Pumpkin pie spice: This warm blend brings the cookies to life; I make my own by combining cinnamon, ginger, nutmeg, and cloves, but store-bought works beautifully too.
Baking soda and baking powder: The combination provides just enough lift without making them cakey.
Salt: Enhances all the flavors, especially the warm spices.
Unsalted butter: Softened to room temperature; I’ve tried these with salted butter in a pinch, but you’ll want to reduce the added salt if you go that route.
Light brown sugar: Packed firmly for accurate measurement; the molasses content contributes to both flavor and chewiness.
Egg yolks: Room temperature for better incorporation; using just the yolks rather than whole eggs helps limit excess moisture.
Vanilla extract: Pure, not imitation, for the best flavor complement to the spices.
For the sugar coating: A simple mixture of granulated sugar and pumpkin pie spice that creates a delicate, sweet crust on the outside of each cookie.
Let’s Get Baking
Prep Your Pumpkin
This step is absolutely non-negotiable for achieving chewiness. Spread your pumpkin puree on a plate and gently press with paper towels. Keep replacing the towels and blotting until you’ve reduced the volume by about half and very little moisture transfers to the paper towels. The first time I tried this technique, I was shocked at how much water came out!
Mix With Intention
I like to whisk together all my dry ingredients first – it ensures the spices and leavening agents distribute evenly. In a separate bowl, cream the butter and brown sugar until it’s noticeably lighter in color and texture. This aerates the mixture and creates the foundation for good texture. Add the egg yolks and vanilla, then your blotted pumpkin, mixing just until combined. When I fold in the dry ingredients, I do it gently and just until no dry flour remains – overmixing can make the cookies tough.
The Rolling Technique
The dough will be slightly sticky – that’s normal! If it’s too difficult to handle, I pop it in the refrigerator for about 10 minutes. Rolling the dough balls in the spiced sugar mixture not only adds a delightful textural element but also infuses more of that wonderful spice flavor. I’ve found that rolling them between my palms creates the most uniform shape.
The Baking Sweet Spot
These cookies don’t need long in the oven – they’re done when they look slightly underbaked in the center but dry to the touch. For my oven, that’s about 9 minutes for tablespoon-sized cookies and 13 minutes for larger ones. I’ve learned through trial and error that leaving them on the hot baking sheet for exactly 5 minutes after removing from the oven allows them to finish cooking through without overdrying.
Make Them Your Own
When my sister visited last Thanksgiving, we added a half cup of white chocolate chips to the dough, which created lovely pockets of sweetness against the spiced cookie. I’ve been making them that way for holiday gatherings ever since.
For a more sophisticated version I served at my book club, I stirred in finely chopped crystallized ginger (about 1/3 cup) and finished the cooled cookies with a thin maple glaze made from powdered sugar and pure maple syrup.
During a particularly creative weekend baking session, I sandwiched vanilla ice cream between two cookies for pumpkin ice cream sandwiches. My husband declared them “better than anything from the ice cream shop,” which I consider high praise indeed!
What I’ve Learned
The blotting technique truly transformed these cookies from good to exceptional. I initially skipped this step during my early test batches, and the difference in texture was remarkable – going from cakey to perfectly chewy.
When measuring flour, using the spoon-and-level method rather than scooping directly with the measuring cup prevents adding too much flour, which would make the cookies dry and dense.
These cookies actually taste better the day after baking as the flavors meld and develop. I store them in an airtight container with a slice of bread, which keeps them perfectly chewy for days.
For the most beautiful cookies, I reserve a bit of the spiced sugar mixture and sprinkle it on top just before baking. This creates a lovely crackled appearance as they spread.
Frequently Asked Questions
Can I use homemade pumpkin puree instead of canned? → You can, but you’ll need to cook it down first as homemade tends to be much wetter. I simmer mine in a saucepan until thickened before even starting the blotting process.
Why did my cookies come out cakey? → You likely didn’t blot the pumpkin enough. It should reduce from 1/2 cup to about 1/4 cup through blotting.
Can I freeze the dough? → Absolutely! I often roll the dough balls, coat in sugar, and freeze on a baking sheet before transferring to a freezer bag. Bake straight from frozen, adding 2-3 minutes to the baking time.
How do I know when they’re done? → They should be set around the edges but still look slightly underbaked in the center. They’ll continue cooking on the hot baking sheet after removal from the oven.
Can I add nuts or chocolate? → Definitely! I’ve tried them with pecans, white chocolate, and even butterscotch chips. Just fold in about 3/4 cup of mix-ins after combining the wet and dry ingredients.
Print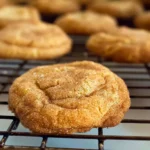
Chewy Pumpkin Cookies
- Total Time: 37 minutes
- Yield: 24 cookies 1x
- Diet: Vegetarian
Description
These irresistibly chewy pumpkin cookies strike the perfect balance between soft and firm, with warm fall spices and real pumpkin flavor. Unlike typical cakey pumpkin cookies, these maintain a delightful chewy texture thanks to a special moisture-reduction technique.
Ingredients
- For the sugar coating:
- 1/4 cup granulated sugar
- 1/2 teaspoon pumpkin pie spice
- For the cookies:
- 1/2 cup canned pumpkin puree (Libby’s recommended)
- 1 3/4 cups all-purpose flour
- 1 tablespoon pumpkin pie spice
- 1/2 teaspoon baking soda
- 1/2 teaspoon baking powder
- 1/2 teaspoon salt
- 3/4 cup unsalted butter, softened
- 1 cup packed light brown sugar
- 2 large egg yolks, room temperature
- 2 teaspoons pure vanilla extract
Instructions
- Preheat and Prepare: Preheat the oven to 350°F. Line two or three large baking sheets with parchment paper to prevent sticking and ensure even baking.
- Make Sugar Coating: Combine 1/4 cup granulated sugar with 1/2 teaspoon pumpkin pie spice in a small bowl. Mix thoroughly until well combined and set aside. This will create a flavorful, spiced exterior for your cookies.
- Reduce Pumpkin Moisture: Spread the pumpkin puree on a plate and blot with paper towels. Repeat this process several times until barely any moisture remains, reducing the puree from 1/2 cup to about 1/4 cup. This crucial step prevents cakey cookies and ensures the desired chewy texture.
- Combine Dry Ingredients: In a medium bowl, whisk together the flour, pumpkin pie spice, baking soda, baking powder, and salt until well combined. This ensures the spices and leavening agents are evenly distributed throughout the dough.
- Cream Butter and Sugar: In a mixing bowl, beat the softened butter and brown sugar until light and fluffy, scraping down the sides of the bowl as needed. This incorporates air into the mixture, contributing to the cookies’ texture.
- Add Wet Ingredients: Beat in the egg yolks and vanilla until fully incorporated. Then add the reduced pumpkin puree and beat until blended, creating a smooth, consistent mixture.
- Incorporate Dry Ingredients: Add the flour mixture to the wet ingredients and beat until just combined. Avoid overmixing, which can develop too much gluten and result in tough cookies.
- Shape Cookies: Using a 1-tablespoon or 2-tablespoon cookie scoop, portion the dough and roll into balls. If the dough is too sticky to handle, refrigerate for 10 minutes. Roll each ball in the prepared sugar-spice mixture to coat completely.
- Bake: Place the coated dough balls on the prepared baking sheets, spacing them at least 2 inches apart to allow for spreading. Bake for 8-10 minutes for smaller cookies or 12-14 minutes for larger cookies, until they appear dry to the touch.
- Cool: Allow the cookies to cool on the baking sheets for 5 minutes before transferring to a wire rack to cool completely. This brief rest on the hot pan helps set the cookies’ structure.
Notes
- The step of reducing moisture from the pumpkin puree is essential for achieving the chewy texture that makes these cookies special.
- These cookies can be stored in an airtight container at room temperature for up to 5 days.
- For a flavor variation, try adding 1/2 cup of chocolate chips, chopped nuts, or dried cranberries to the dough.
- You can freeze the cookie dough balls (before rolling in sugar) for up to 3 months. When ready to bake, thaw slightly, roll in the sugar mixture, and add 1-2 minutes to the baking time.
- For a more pronounced spice flavor, you can add 1/4 teaspoon of ground ginger or cloves to the cookie dough.
- Prep Time: 25 minutes
- Cook Time: 12 minutes
- Category: Desserts
- Method: Baking
- Cuisine: American
Nutrition
- Serving Size: 1 cookie
- Calories: 145
- Sugar: 10g
- Sodium: 75mg
- Fat: 7g
- Saturated Fat: 4g
- Unsaturated Fat: 2g
- Trans Fat: 0g
- Carbohydrates: 20g
- Fiber: 1g
- Protein: 2g
- Cholesterol: 30mg