


I’ve always believed that some desserts have an almost magical ability to transform an ordinary gathering into something special. This chocolate peanut butter cheesecake is one of those recipes in my collection. I perfected it last winter when I was testing recipes for my sister’s birthday celebration. After five different variations (and many willing taste-testers among my friends), this version emerged as the clear winner – a perfect balance of rich chocolate and nutty peanut butter layered over a fudgy brownie crust.
The first time I served this cheesecake, conversation around my dining table came to a complete halt. That moment of collective appreciation – when everyone takes their first bite and suddenly falls silent – is what I live for as a home cook. It’s now become my go-to recipe when I want to create a moment of pure dessert bliss without spending hours in the kitchen.
Why This Recipe Became My Secret Weapon
What makes this cheesecake special is the thoughtful layering of complementary flavors and textures. The fudgy brownie base provides a substantial foundation that holds up beautifully against the creamy cheesecake layer. I discovered that using applesauce in the brownie base keeps it moist without adding extra oil, creating the perfect texture to support the silky cheesecake above.
The chocolate peanut butter filling is where I spent most of my testing time. I found that room-temperature ingredients make all the difference in achieving that perfectly smooth texture. The Greek yogurt might seem like an unusual addition, but it adds a subtle tanginess that balances the sweetness and creates a lighter texture than using all cream cheese. Every component plays a role in creating a dessert that feels indulgent but not overwhelmingly heavy.
What You’ll Need
For the Brownie Crust:
- Brownie mix: A standard 10.25-ounce package; I’ve tested several brands and they all work well, so use your favorite
- Applesauce: Unsweetened works best; this creates moisture without the extra fat of oil
- Water: Just enough to bring the batter together
- Egg: This binds everything together; make sure it’s at room temperature for better incorporation
For the Chocolate Peanut Butter Cheesecake:
- Greek yogurt: Low-fat vanilla adds a subtle tang that balances the richness; I’ve found letting it come to room temperature is crucial for a smooth batter
- Cream cheese: The foundation of any good cheesecake; again, room temperature is non-negotiable for avoiding lumps
- Chocolate and Peanut Butter Milk: This adds a gentle flavor foundation; regular milk works fine if you can’t find the flavored version
- Sugar: Just enough to sweeten without overwhelming the chocolate and peanut butter flavors
- Eggs: These provide structure and that characteristic cheesecake texture
- White whole-wheat flour: A small amount stabilizes the filling; all-purpose works just as well if that’s what you have on hand
- Vanilla extract: I always use pure extract for the cleanest flavor
- Peanut butter: Creamy works best for the filling; I prefer brands without added sugar for more control over the final sweetness
- Cocoa powder: This intensifies the chocolate flavor; natural unsweetened gives the best chocolate depth
For the Toppings:
- Natural peanut butter: I specifically recommend the drippy kind because it creates beautiful drizzles without needing to be warmed
- Hot fudge topping: Store-bought is fine; I keep a jar in my pantry for spontaneous dessert cravings
- Dark chocolate: Rough chopping creates varied textures that add visual interest when I photograph the finished cheesecake
Let’s Get Baking
Start with the Foundation
Preheat your oven to 350°F. In my experience, taking the time to properly preheat makes a significant difference in how evenly the brownie base bakes. While that’s happening, mix together the brownie mix, applesauce, water, and egg until well combined. I find a wooden spoon works perfectly for this – no need for electric mixers at this stage.
Spray a 12-inch springform pan with nonstick spray and pour in your brownie batter. When I was developing this recipe, I tested both 10-inch and 12-inch pans – both work, but I prefer the 12-inch for a slightly thinner, more balanced ratio of brownie to cheesecake. Bake for about 20 minutes until the brownies are just cooked through. You’ll know it’s ready when the center is set but still slightly fudgy. Set this aside to cool while you prepare the filling.
Creating Creamy Perfection
Turn your oven down to 325°F – this gentler temperature is one of my secrets for achieving that perfectly smooth cheesecake texture without cracks.
Now for the most important step: place all your cheesecake ingredients in a food processor and blend until very smooth. I spent several test batches discovering that the food processor creates a significantly smoother texture than a stand mixer for this particular recipe. Take a spatula and scrape down the sides to ensure everything is evenly incorporated. This extra minute of attention makes all the difference in the final texture.
Spread your cheesecake mixture over the cooled brownie crust, taking care to smooth the top with a spatula. I like to tap the pan gently on the counter a few times to release any air bubbles – a trick my grandmother taught me years ago.
The Magic Happens
Bake for 40-45 minutes until just the center 2-3 inches are slightly jiggly like jello, but the rest is firm. This was the trickiest part to perfect in my testing – the first few attempts, I overbaked and ended up with a dry cheesecake. Learning to trust that slight jiggle changed everything.
Once it’s done, resist the urge to open the oven door immediately. I’ve found that gradual cooling prevents those dramatic cracks that can happen with sudden temperature changes. Remove from the oven and let it cool for 2 hours at room temperature before refrigerating to complete the cooling process.
Fresh Finish
When you’re ready to serve, that’s when the magic of the toppings transforms this from a simple cheesecake to a showstopper. Drizzle with natural peanut butter, allowing it to create casual, artistic streaks across the surface. Add ribbons of hot fudge in between the peanut butter drizzles. Finally, scatter chopped dark chocolate over the top – I love how the pieces catch the light when I photograph the finished dessert by my dining room window.
Make It Your Own
Over the dozen or so times I’ve made this cheesecake, I’ve played with several variations that worked beautifully:
For my nephew’s birthday last summer, I added a layer of chopped peanut butter cups between the brownie and cheesecake layers. The surprise bursts of candy were a huge hit with the kids.
During the holidays, I sometimes add a quarter teaspoon of espresso powder to the chocolate mixture – it doesn’t make the cheesecake taste like coffee, but it deepens the chocolate flavor in a way that pairs beautifully with after-dinner coffee.
For a dinner party last month when I had a guest with a peanut allergy, I successfully substituted almond butter for the peanut butter and it was delicious – different, but equally satisfying with a more subtle nutty flavor.
What I’ve Learned
Through my many test batches, I’ve discovered a few crucial techniques that make all the difference:
Room temperature ingredients aren’t just a suggestion – they’re essential for achieving that perfectly smooth texture. When I’m in a hurry, I place the cream cheese packages in warm water for about 15 minutes to speed up the process.
The jiggle test is more reliable than timing. Every oven runs differently (mine tends to run hot in the back left corner), so I’ve learned to trust the visual cues rather than the clock.
Cooling gradually is non-negotiable. The one time I rushed and refrigerated the cheesecake too quickly, I ended up with a crater-sized crack across the surface.
When adding the toppings, less is sometimes more. I’ve found that applying the drizzles with a light hand creates a more elegant presentation than drowning the cheesecake in toppings.
Frequently Asked Questions
Can I make this without a springform pan? → While springform is ideal, I’ve successfully used a deep pie dish lined with parchment paper with enough overhang to lift the cheesecake out after cooling.
Can I substitute the Greek yogurt? → In a pinch, sour cream works beautifully as a 1:1 replacement. I’ve tried both and the difference is subtle – the yogurt version is slightly tangier.
How far ahead can I make this? → This cheesecake actually improves with time! I often make it two days before serving, which allows the flavors to meld perfectly.
My cheesecake cracked – what happened? → This usually happens from either overbaking or cooling too quickly. But don’t worry – that’s exactly why I developed this recipe with toppings that can strategically cover any imperfections!
Can I freeze leftovers? → Absolutely! Slice before freezing and wrap individual pieces in plastic wrap. They’ll keep for up to a month, and I actually love the texture when it’s just slightly thawed.
The beauty of this cheesecake isn’t just in how it looks or tastes – it’s in how it brings people together around my table. Whether it’s for a special celebration or simply because we made it through another week, this dessert has a way of creating moments of shared joy that linger long after the last crumb disappears.
Print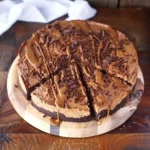
Chocolate Peanut Butter Cheesecake
- Total Time: 6 hours (including cooling and chilling time)
- Yield: 12 servings 1x
Description
A decadent dessert combining rich chocolate brownie crust with a velvety peanut butter cheesecake layer, topped with indulgent drizzles of peanut butter and hot fudge for the ultimate sweet treat.
Ingredients
- Brownie Crust
- 10.25 ounce package brownie mix
- 1/2 cup applesauce
- 2 tablespoons water
- 1 egg
- Chocolate Peanut Butter Cheesecake
- 1 cup low-fat vanilla Greek yogurt, room temperature
- 16 ounces cream cheese, room temperature
- 1/2 cup Chocolate and Peanut Butter Milk (or 1/2 cup regular milk)
- 1 cup sugar
- 3 large eggs, room temperature
- 1/4 cup white whole-wheat flour
- 2 teaspoons pure vanilla extract
- 1/2 cup creamy peanut butter
- 1/4 cup cocoa powder
- Toppings
- Natural peanut butter (the drippy kind)
- Hot fudge topping
- Dark chocolate, chopped
Instructions
- Prepare the Brownie Crust: Preheat oven to 350 degrees. In a large mixing bowl, mix together the brownie mix, applesauce, water and egg until well combined. Spray a 12-inch springform pan (a 10-inch springform pan will probably work as well) with nonstick spray and pour batter into the pan. Bake for about 20 minutes until the brownies are cooked through. Remove from the oven and let cool.
- Adjust Oven Temperature: Turn oven down to 325 degrees for the cheesecake layer.
- Prepare Cheesecake Filling: In a food processor, blend all ingredients for cheesecake until very smooth. Take a spatula and scrape the sides to ensure that everything is blended thoroughly. This step ensures a creamy, lump-free cheesecake with perfectly distributed chocolate and peanut butter flavors.
- Assemble and Bake: Spread cheesecake mixture into springform pan over brownie crust and smooth the top with a spatula. Bake for 40-45 minutes until 2-3 inches of the cheesecake in the center are slightly jiggly like jello but the rest is firm.
- Cool and Chill: Remove from oven and let cool for 2 hours at room temperature. Then refrigerate to completely cool after those 2 hours. This gradual cooling helps prevent cracks in your cheesecake surface.
- Add Toppings and Serve: When you’re ready to serve, drizzle with peanut butter and hot fudge. Top with chopped dark chocolate for an extra touch of decadence.
Notes
- Allow cream cheese and Greek yogurt to come to room temperature before mixing to avoid lumps in your cheesecake.
- The slight jiggle in the center is crucial – it will continue to cook and set as it cools.
- For clean slices, dip your knife in hot water and wipe dry between cuts.
- Store leftovers covered in the refrigerator for up to 5 days.
- This cheesecake can be frozen for up to 3 months if wrapped tightly.
- Prep Time: 30 minutes
- Cook Time: 65 minutes
- Category: Desserts
- Method: Baking
- Cuisine: American
Nutrition
- Serving Size: 1 slice
- Calories: 485
- Sugar: 38g
- Sodium: 320mg
- Fat: 28g
- Saturated Fat: 12g
- Unsaturated Fat: 14g
- Trans Fat: 0g
- Carbohydrates: 48g
- Fiber: 2g
- Protein: 12g
- Cholesterol: 105mg