


These Honeycomb Marshmallow Treats offer a delightful twist on the classic rice krispy treats, combining the sweet crunch of Honeycomb cereal with gooey marshmallows and savory roasted peanuts. The addition of real honey intensifies the honeycomb flavor, creating a nostalgic treat that’s both simple to make and irresistibly delicious. Perfect for an easy dessert, after-school snack, or a sweet addition to any gathering.
Why You’ll Love This Recipe
- Ready in just 15 minutes with minimal cleanup and no baking required
- The perfect balance of crunchy, chewy, and sweet with a hint of saltiness from the peanuts
- Easily customizable with different mix-ins or toppings to suit your preferences
- Great make-ahead treat that can be stored for several days
- Kid-friendly recipe that’s simple enough for little helpers to assist with
Ingredients
- Honeycomb Cereal: The star ingredient that provides a distinctive honey-sweet flavor and unique texture. Make sure it’s fresh for maximum crunchiness.
- Mini Marshmallows: These melt more quickly and evenly than regular marshmallows. In a pinch, you can substitute large marshmallows cut into smaller pieces.
- Roasted Salted Peanuts: Adds a wonderful savory crunch and balances the sweetness. The salt creates a perfect sweet-salty combination.
- Unsalted Butter: Creates the rich base for the marshmallow mixture. Using unsalted allows you to control the saltiness of the final product.
- Honey: Enhances the honeycomb flavor and adds a natural sweetness. Choose a high-quality honey for the best flavor profile.
Variations
Chocolate Drizzle Version
Transform these treats with a drizzle of melted chocolate over the top. Once the treats have cooled slightly, melt some chocolate chips in the microwave and drizzle over the top. Allow to set before cutting for a beautiful presentation and chocolate-honey flavor combination.
Fruity Honeycomb Treats
Add 1/2 cup of dried cranberries, cherries, or chopped dried apricots instead of peanuts for a fruity twist. The tartness of the dried fruit complements the sweetness of the honeycomb and marshmallows beautifully.
Double Honey Crunch
Double down on the honey flavor by using honey-roasted peanuts instead of regular roasted peanuts, and increase the honey to 3-4 tablespoons. This variation is perfect for serious honey lovers who want that extra honey punch.
How to Make the Recipe
Step 1: Prepare Your Workspace
Before starting, line your 8×8 inch baking pan with parchment paper or spray it with non-stick cooking spray. Have all ingredients measured and ready to go, as this recipe moves quickly once you start melting the marshmallows.
Step 2: Create the Marshmallow Base
In a large saucepan, melt the butter over low heat, ensuring it doesn’t brown. Once melted, add the mini marshmallows and stir continuously until completely melted and smooth. Low heat is crucial here to prevent the sugar from burning.
Step 3: Add Flavor Enhancers
Once the marshmallows are melted, remove from heat and quickly stir in the peanuts and honey until well combined. The honey will add a glossy sheen and enhance the honeycomb flavor.
Step 4: Incorporate the Cereal
Add the Honeycomb cereal to the marshmallow mixture and fold gently but quickly to coat every piece without crushing the cereal. Make sure all cereal is evenly coated with the marshmallow mixture.
Step 5: Set and Cool
Immediately transfer the mixture to your prepared pan and press down gently with slightly damp hands or a piece of parchment paper to create an even layer. Allow to cool completely at room temperature, which takes about 30-45 minutes, before cutting into squares.
Tips for Making the Recipe
- Work quickly once the marshmallows are melted as the mixture will begin to set as it cools
- To prevent sticking when pressing the mixture into the pan, lightly coat your hands with cooking spray or butter
- For cleaner cuts, use a sharp knife that’s been lightly sprayed with cooking spray
- Be careful not to crush the cereal while mixing – fold gently to maintain the texture
- For extra honey flavor, drizzle a little additional honey on top before the treats set
- Let the treats cool completely before cutting to prevent a sticky mess
How to Serve
These Honeycomb Marshmallow Treats can be served on their own as a delightful sweet snack or dessert. For special occasions, consider cutting them into fun shapes using cookie cutters or serving on a platter with other finger desserts. They pair wonderfully with a cold glass of milk, hot cocoa, or coffee for adults. For an extra-special dessert, serve slightly warmed with a scoop of vanilla ice cream on the side.
Make Ahead
These treats are perfect for making ahead of time. Once prepared, they will keep at room temperature in an airtight container for up to 3 days. Place parchment paper between layers to prevent sticking. For longer storage, wrap individual pieces in plastic wrap and freeze for up to 6 weeks. Thaw at room temperature before serving.
If you’re preparing for a party, you can make these 1-2 days in advance and store them in an airtight container. They actually taste even better on day two when the flavors have had time to meld together.
FAQs
Can I use a different cereal instead of Honeycomb?
Yes! While Honeycomb cereal gives these treats their distinctive flavor and name, you can substitute with other cereals like Corn Flakes, Chex, or even a combination of cereals for a unique twist.
My treats turned out too hard. What went wrong?
Overly firm treats usually come from cooking the marshmallow mixture at too high a temperature or for too long. Remember to use low heat and remove from heat as soon as the marshmallows are melted.
Can I make these without nuts for allergy concerns?
Absolutely! Simply omit the peanuts entirely or substitute with seeds like sunflower or pumpkin seeds if they’re safe for your audience. You could also use chocolate chips or dried fruit instead.
How can I prevent my treats from sticking to the pan?
Lining your pan with parchment paper with overhanging edges creates handles that make removal easy. Alternatively, a good coating of non-stick spray works well too. For extra insurance, you can lightly butter the parchment or foil.
Conclusion
These Honeycomb Marshmallow Treats offer a delightful twist on a classic dessert that’s sure to bring smiles to everyone who tries them. With their perfect balance of honey sweetness, marshmallow chewiness, and nutty crunch, they’re an irresistible treat that comes together in minutes. Whether you’re making them for a special occasion, an after-school snack, or just because you’re craving something sweet, this recipe is guaranteed to become a new favorite in your household. Give them a try today and discover just how amazing this simple dessert can be!
Print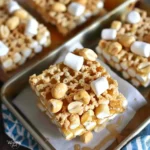
Honeycomb Marshmallow Treats
- Total Time: 1 hour 15 minutes (including cooling time)
- Yield: 16 squares 1x
- Diet: Vegetarian
Description
Sweet, crunchy, and irresistibly gooey, these Honeycomb Marshmallow Treats combine the nostalgic flavor of Honeycomb cereal with roasted peanuts and a touch of honey for an elevated take on classic marshmallow bars.
Ingredients
- 4½ cups Honeycomb Cereal
- 10 ounces mini marshmallows
- 1 cup roasted salted peanuts
- ¼ cup unsalted butter
- 2 tablespoons honey (add more for stronger honey flavor)
Instructions
- Prepare Your Pan: Line an 8×8 inch baking pan with parchment paper or spray with non-stick cooking spray. This will make it easier to remove the treats once they’ve set.
- Melt The Butter: In a large saucepan, add the unsalted butter and melt it over low heat. Using low heat is crucial to prevent the butter from burning and to ensure a smooth base for your marshmallow mixture.
- Melt The Marshmallows: Add the mini marshmallows to the melted butter and stir continuously until they are completely melted and smooth. Keep the heat low to prevent scorching, which can cause a bitter taste.
- Add Peanuts And Honey: Stir in the roasted salted peanuts and honey until well combined. The honey adds a natural sweetness that complements the honeycomb cereal, while the peanuts provide a satisfying crunch and savory balance.
- Incorporate The Cereal: Remove the pan from heat and quickly add the Honeycomb cereal to the marshmallow mixture. Stir rapidly to ensure all cereal pieces are evenly coated before the mixture begins to cool and set.
- Press Into Pan: Immediately transfer the mixture to your prepared 8×8 inch pan. Using a piece of parchment paper or a greased spatula, firmly press the mixture into an even layer, making sure to reach the corners.
- Cool And Cut: Allow the treats to cool completely at room temperature, which typically takes about 1 hour. Once set, cut into squares of desired size and serve.
Notes
- For best results, use fresh marshmallows as older ones can be difficult to melt smoothly.
- If the mixture is too sticky to work with, lightly grease your hands or utensils with cooking spray.
- Store in an airtight container at room temperature for up to 3 days for optimal freshness.
- For a fun variation, try drizzling melted chocolate over the top once cooled.
- These treats can be made ahead and frozen for up to a month – just place wax paper between layers.
- Prep Time: 10 minutes
- Cook Time: 5 minutes
- Category: Snacks
- Method: Stovetop
- Cuisine: American
Nutrition
- Serving Size: 1 square
- Calories: 180
- Sugar: 15g
- Sodium: 120mg
- Fat: 8g
- Saturated Fat: 3g
- Unsaturated Fat: 4g
- Trans Fat: 0g
- Carbohydrates: 27g
- Fiber: 1g
- Protein: 3g
- Cholesterol: 10mg