


This Easter Dirt Cake Casserole transforms classic dirt cake into a springtime celebration with festive pastel colors and playful decorations. Featuring layers of crushed Oreos, creamy pudding, and sweet candies, this no-bake dessert is as delightful to look at as it is to eat. Perfect for Easter gatherings, spring parties, or anytime you want to bring a touch of whimsy to the dessert table.
Why You’ll Love This Recipe
- No baking required, making it perfect for busy holidays or warm spring days
- Make-ahead friendly, allowing you to prepare it up to 2 days before serving
- Kid-friendly design that doubles as a fun activity to make with children
- Customizable colors and decorations to match any spring celebration
- Crowd-pleasing flavors that combine creamy, crunchy, and chocolatey elements in one dessert
Ingredients
- Oreo Cookies: The foundation of this dessert, providing that classic “dirt” appearance and delicious chocolate flavor. Regular Oreos work best, but you can use Double Stuf or chocolate cream varieties for different flavor intensities.
- Cream Cheese: Creates a rich, tangy base for the filling. Allow it to soften properly at room temperature for the smoothest texture. Full-fat gives the best flavor, but reduced-fat works if preferred.
- Unsalted Butter: Adds richness and helps create that silky-smooth cream cheese layer. Make sure it’s properly softened for easy mixing.
- Powdered Sugar: Sweetens the cream cheese mixture while maintaining a smooth texture. Don’t substitute with granulated sugar as it will create a grainy consistency.
- Vanilla Pudding Mix: The instant variety creates a quick-setting, creamy middle layer. French vanilla pudding can be substituted for a slightly different flavor profile.
- Cold Milk: Essential for activating the pudding mix. Whole milk creates the richest texture, but 2% or even skim milk works in a pinch.
- Whipped Topping: Cool Whip is the traditional choice for its stability and texture. For a homemade alternative, whip 2 cups of heavy cream with 1/4 cup powdered sugar until stiff peaks form.
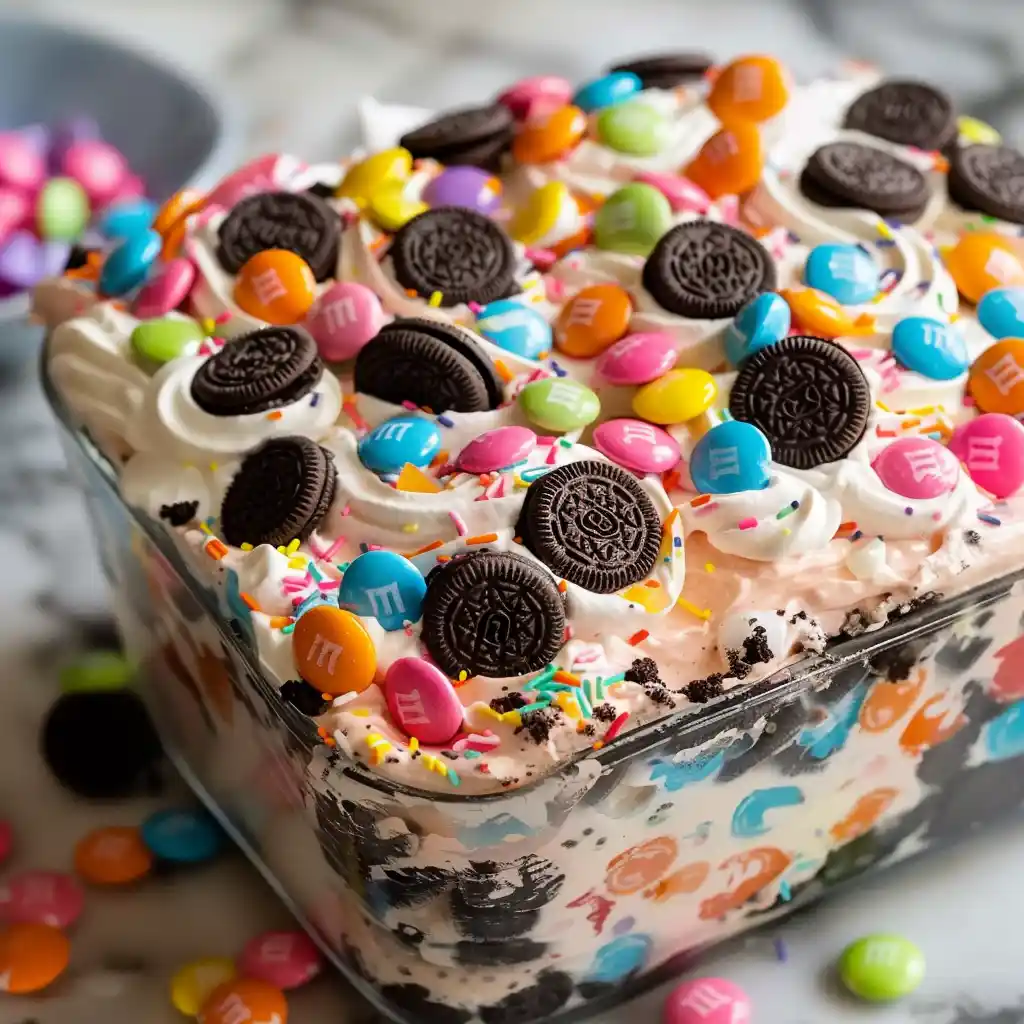
- Pastel-Colored Candy-Coated Chocolates: Adds festive spring colors and a sweet crunch. Easter-colored M&M’s are perfect, but any pastel chocolate candies work beautifully.
- Mini Oreo Cookies: A decorative topping that reinforces the Oreo flavor while adding visual interest. Regular Oreos broken into pieces can substitute if mini versions aren’t available.
Variations
Chocolate Lover’s Version
Transform this dessert into a chocolate paradise by substituting chocolate pudding for vanilla and adding a layer of chocolate ganache between the Oreo base and cream cheese mixture. Top with chocolate shavings and chocolate candies for an extra indulgent treat.
Spring Garden Theme
Create a garden-themed dessert by decorating the top with green-tinted coconut “grass,” candy flowers, and chocolate bunnies or chicks. Add gummy worms peeking out from the “dirt” for a whimsical touch that kids will love.
Individual Dirt Cups
Instead of making one large casserole, portion the dessert into clear plastic cups or small mason jars for individual servings. Layer as directed in the recipe but in single-serving containers. This makes for adorable presentations at parties and easier serving.
How to Make the Recipe
Step 1: Prepare the Oreo Base
Crush the Oreos into fine crumbs using a food processor or place them in a sealed plastic bag and crush with a rolling pin. The texture should resemble soil or dirt. Reserve about 1/2 cup of the crushed Oreos for the topping, then spread the remaining crumbs evenly across the bottom of a 9×13-inch dish, pressing lightly to create a level base.
Step 2: Create the Cream Cheese Mixture
In a large mixing bowl, beat the softened cream cheese and butter together until completely smooth and free of lumps. Add the powdered sugar and continue beating until well incorporated and fluffy. This creates the rich, creamy foundation for your filling. Be sure to scrape down the sides of the bowl to ensure everything is evenly mixed.
Step 3: Prepare the Pudding Layer
In a separate bowl, whisk together the vanilla pudding mix and cold milk for about 2 minutes until it begins to thicken. Allow it to sit for an additional 5 minutes to fully set. The pudding should be thick but still pourable. Gently fold this pudding mixture into the cream cheese mixture, combining thoroughly but carefully to maintain the light texture.
Step 4: Assemble and Decorate
Pour the creamy filling mixture over the Oreo base, spreading it evenly with a spatula. Sprinkle the reserved crushed Oreos over the top to create the “dirt” effect. Decorate with pastel-colored candies and mini Oreo cookies, arranging them in an appealing pattern across the top. Cover the dish with plastic wrap and refrigerate for at least 2 hours (preferably 4 hours) to allow all the flavors to meld and the dessert to set properly.
Tips for Making the Recipe
- Chill your mixing bowl and beaters before whipping the cream cheese mixture for extra fluffiness
- Use a clear glass dish if possible to showcase the beautiful layers
- Allow cream cheese to fully soften at room temperature for about 30 minutes to avoid lumps
- Crush Oreos to varying textures – some fine, some chunky – for more interesting “dirt”
- Chill thoroughly before serving – overnight is ideal for the best flavor development
- Keep refrigerated until ready to serve as the dessert will soften quickly at room temperature
How to Serve
Serve this Easter Dirt Cake Casserole chilled, cutting into squares with a sharp knife that’s been run under hot water (and wiped dry) between cuts for the cleanest slices. Present on colorful spring-themed plates or napkins to enhance the festive feel.
This dessert pairs beautifully with fresh berries on the side, especially strawberries or raspberries, which add a bright, tangy contrast to the rich creaminess. For special occasions, add a scoop of vanilla ice cream or a dollop of whipped cream on the side.
For an extra festive touch, garnish serving plates with a sprig of fresh mint or a few edible flowers like pansies or violets.
Make Ahead
This Easter Dirt Cake Casserole is an excellent make-ahead dessert. You can prepare it up to 2 days in advance and keep it refrigerated until ready to serve. If making more than a day ahead, consider adding the decorative candy toppings closer to serving time to prevent any color bleeding into the cream layer.
For longer storage, the assembled dessert (without candy decorations) can be frozen for up to 2 weeks. Wrap tightly with plastic wrap followed by aluminum foil to prevent freezer burn. Thaw overnight in the refrigerator and add decorations before serving.
Individual components can also be prepared separately in advance: crush the Oreos and store in an airtight container for up to a week, and mix the cream cheese filling a day ahead and refrigerate separately.
FAQs
Can I make this dessert dairy-free?
Yes! Use dairy-free cream cheese, plant-based butter, non-dairy whipped topping, and prepare the pudding with almond or oat milk. Check that your Oreos and candies are also dairy-free (most original Oreos are).
How long will Easter Dirt Cake Casserole keep in the refrigerator?
This dessert will keep well in the refrigerator for up to 5 days. The texture of the Oreos will soften over time, giving the dessert more of a cake-like consistency after a couple of days.
Can I use homemade whipped cream instead of Cool Whip?
Absolutely! Whip 2 cups of heavy cream with 1/4 cup powdered sugar and 1 teaspoon vanilla extract until stiff peaks form. Fold this into your mixture in place of the Cool Whip. Note that homemade whipped cream may not hold up as long, so plan to serve the dessert within 24 hours.
Is there a way to make this recipe less sweet?
Yes, you can reduce the powdered sugar in the cream cheese mixture by up to half. Also, consider using dark chocolate Oreos instead of regular ones and decreasing the amount of candy toppings.
Conclusion
This Easter Dirt Cake Casserole brings together the beloved flavors of classic dirt cake with a festive spring twist that’s perfect for holiday celebrations. The combination of creamy, crunchy textures and playful presentation makes it a hit with both kids and adults alike. Whether you’re hosting an Easter gathering or simply want to celebrate the arrival of spring, this no-bake dessert is sure to become a family favorite that everyone will request year after year.
Print
Easter Dirt Cake Casserole: A Festive No-Bake Spring Dessert
- Total Time: 2 hours 20 minutes (including chilling time)
- Yield: 12 servings 1x
Description
A delightful no-bake dessert featuring layers of crushed Oreos, creamy pudding, and festive spring candy toppings—perfect for Easter celebrations or any springtime gathering!
Ingredients
- 1 package (14 oz) Oreo cookies, crushed
- 1 package (8 oz) cream cheese, softened
- ¼ cup unsalted butter, softened
- 1 cup powdered sugar
- 1 package (3.4 oz) instant vanilla pudding mix
- 2 cups cold milk
- 1 container (8 oz) whipped topping (Cool Whip), thawed
- 1 cup pastel-colored candy-coated chocolates (e.g., M&M’s)
- ½ cup mini Oreo cookies (for topping)
Instructions
- Prepare the Oreo Crust: Place the Oreo cookies in a food processor and pulse until finely crushed, or place them in a ziplock bag and crush with a rolling pin. Set aside ½ cup of the crushed Oreos for the topping. Spread the remaining crushed Oreos evenly into the bottom of a 9×13-inch baking dish to form the base layer.
- Create the Cream Cheese Layer: In a large mixing bowl, beat the softened cream cheese, softened butter, and powdered sugar together until smooth and creamy. This forms the rich base of your filling that balances the sweetness with a slight tanginess from the cream cheese.
- Make the Pudding Mixture: In a separate bowl, whisk together the vanilla pudding mix and cold milk until well combined. Let it sit for about 5 minutes to thicken properly. The pudding adds a silky texture and vanilla flavor to complement the Oreo base.
- Combine the Fillings: Gently fold the thawed whipped topping into the cream cheese mixture until fully incorporated. Then fold in the thickened pudding mixture until everything is smooth and evenly combined. This creates a light, airy filling with the perfect balance of flavors.
- Assemble the Layers: Pour the combined filling mixture over the Oreo crust in the baking dish, spreading it evenly with a spatula. Sprinkle the reserved ½ cup of crushed Oreos over the top to create the “dirt” effect.
- Add Festive Decorations: Scatter the pastel-colored candy-coated chocolates and mini Oreo cookies across the top of the dessert for a colorful Easter-themed finish. Arrange them in a pattern or randomly for a playful appearance.
- Chill and Set: Cover the dish with plastic wrap and refrigerate for at least 2 hours, but preferably 4 hours or overnight. This allows all the flavors to meld together and the dessert to set properly for easier serving.
Notes
- For a more festive Easter presentation, create a small indentation in the center and add chocolate bunnies or Easter-themed decorations.
- You can use any spring-colored candies like Cadbury Mini Eggs or jelly beans instead of M&M’s.
- This dessert can be made up to 2 days in advance and kept refrigerated.
- For a cleaner presentation, consider using a trifle dish to showcase the layers.
- To make individual servings, assemble in clear cups or mason jars for a fun portable dessert.
- Prep Time: 20 minutes